Throwing a baseball might seem straightforward, but mastering the perfect throw involves technique, precision, and practice. Whether you’re a beginner aiming to learn the basics or an experienced player looking to refine your skills, this guide is for you. From grip to follow-through, we’ll break down the essential steps and share tips to enhance your throwing power and accuracy. Get ready to elevate your game and impress on the field with our expert advice. Stay tuned to discover the art of throwing a baseball like a pro!
Mastering the Art of Baseball Throwing
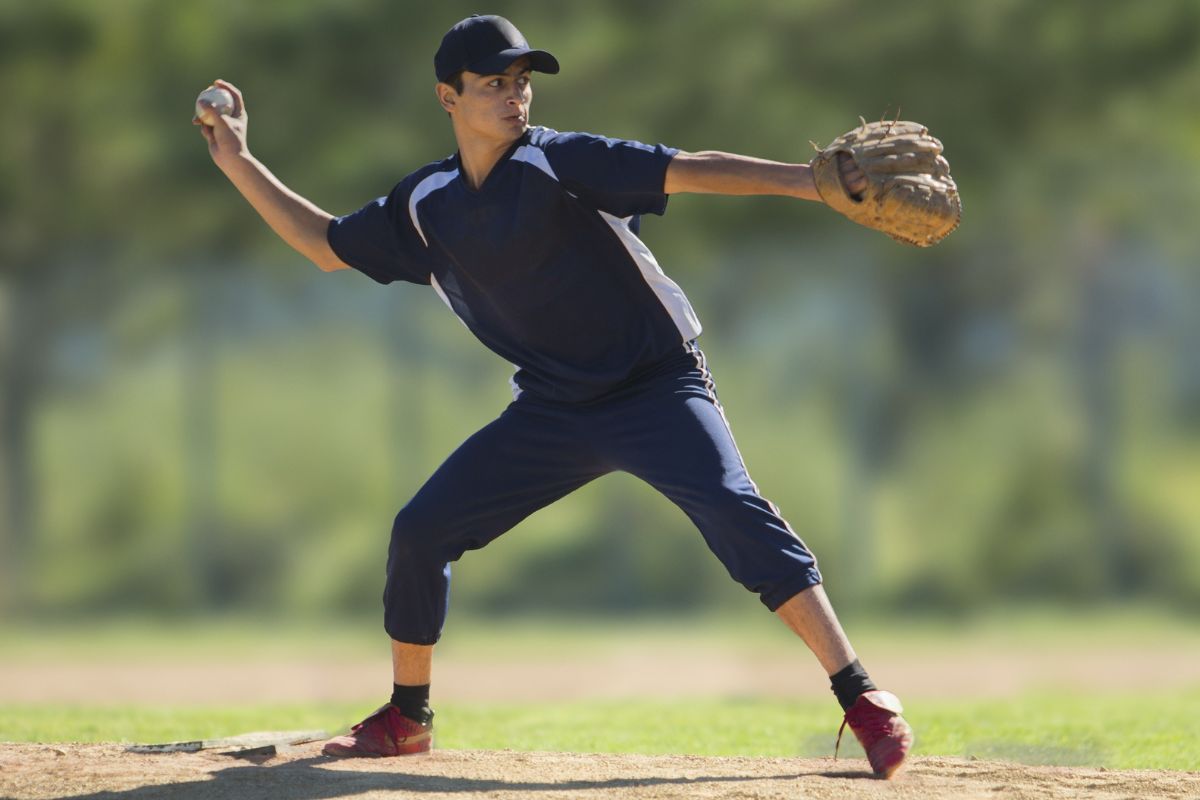
Throwing a baseball effectively demands a combination of technique, power, and precision. Understanding the fundamental mechanics is crucial, whether you’re a beginner aiming to improve your throw or an experienced player seeking to polish your skills. The process begins with the grip. Place the baseball in your hand so that your fingers are atop the ball, allowing for control and speed. Your thumb should rest lightly underneath, balancing it. This position enables you to apply the necessary backspin on the throw, which stabilizes the baseball through the air, enhancing both accuracy and velocity.
Next, focus on your stance and body alignment. Stand with your feet shoulder-width apart, knees slightly bent, and your weight distributed evenly. As you prepare to throw, turn your body sideways to your target, keeping your shoulders aligned with your hips. This creates a strong foundation for your throw. When you’re ready, lift the arm with the baseball in a smooth, circular motion, leading with your elbow and keeping your forearm and wrist relaxed. As you bring your arm forward, rotate your hips and shoulders towards your target. Release the ball when your throwing arm is fully extended and your hand is at its highest point. To ensure the throw’s power and direction, follow through, allowing your arm to naturally come down and across your body.
Incorporating these techniques into your practice will significantly improve your throwing capabilities. Remember, the key to a successful throw lies in the balance of power, precision, and mechanics. Consistent practice, coupled with a keen attention to detail, will have you mastering the art of throwing a baseball in no time.
Choosing the Right Ball
Before mastering the art of throwing a baseball, selecting the appropriate ball is crucial for both safety and performance. Typically, baseballs are categorized into three main types: safety balls, training balls, and game balls.
Safety balls are designed for younger players or beginners. They are softer and significantly reduce the risk of injuries, making them an excellent choice for those just starting.
Training balls, on the other hand, offer a range of functionalities such as reduced flight for practicing in limited spaces or weighted for strength training and improving arm speed.
Game balls are used in official matches and are constructed to meet specific league standards. They have a full-grain leather cover, a cork and rubber core, and are wound tightly to ensure durability and consistent performance.
When choosing a ball, consider the player’s age, skill level, and the purpose of the ball. For younger players or those looking to improve specific aspects of their throw, a safety or training ball might be more appropriate. However, for competitive play, investing in a high-quality game ball is essential.
Finally, the feel of the ball is not to be overlooked. Each type of ball will have a distinct feel due to its construction. It’s essential to spend time practicing with the same type of ball that will be used in games to ensure comfort and familiarity. This element can significantly impact a player’s ability to throw accurately and with confidence.
Grip Techniques Explained
The way you grip a baseball is fundamental to your throwing accuracy, speed, and the ball’s spin. One widely accepted grip is the four-seam fastball grip. Positioning your fingers across the seams allows for maximum velocity as the aerodynamics minimize air resistance, letting the ball cut through the air with a stable flight. It’s essential for pitches where speed is crucial.
Another technique is the two-seam fastball grip, where the fingers are placed along the seams. This grip affects the ball’s aerodynamics differently, often resulting in more movement as the ball travels towards the batter, making it harder to hit. Mastery of both techniques enables a pitcher to vary their pitches effectively, keeping batters guessing. To properly execute these grips, your thumb placement is as critical as your fingers’. Your thumb should rest comfortably underneath the ball, balancing the pressure from your fingers. This balance is crucial for control and preventing injury.
Beyond these, the changeup and curveball grips allow pitchers to diversify their arsenal further. The changeup involves a grip similar to the fastball but with the ball settled more deeply in the hand, reducing speed while maintaining arm motion, deceiving the batter. The curveball, requiring the pitcher to grip the ball with the index finger along a seam and the thumb beneath for support, introduces pronounced movement, dropping as it approaches the plate.
Key Grip Positions Table
| Pitch Type | Grip Technique | Primary Effect |
| Four-Seam Fastball | Fingers across seams | Speed with stability |
| Two-Seam Fastball | Fingers along seams | Increased movement |
| Changeup | Ball deep in hand | Deceptive speed |
| Curveball | Index finger along one seam | Pronounced drop |
Understanding these grip techniques and when to use them can significantly enhance a pitcher’s effectiveness on the mound. The key to mastery lies in practice, consistency, and adaptability, allowing for adjustments based on the game situation and the opposing batter’s weaknesses. With time and dedication, these grips can become second nature, forming the foundation of a diverse and formidable pitching skill set.
Stance for Maximum Power
Achieving maximum power in a baseball throw stems from a solid stance. This foundation allows for kinetic energy to be transferred effectively from your lower body through to your arm and into the ball. Initially, your feet should be positioned slightly wider than shoulder-width apart, ensuring a balanced and stable base. Toe alignment is crucial; your toes should be pointed slightly inward, preparing your body for a powerful pivot.
The bend in your knees is another pivotal aspect. This slight flexion creates a spring-like effect, storing energy that will be unleashed during the throw. Your weight should be evenly distributed or slightly more on the back foot, poised for the forward motion. This stance resembles a tightly coiled spring, ready to release energy efficiently and powerfully.
As for your upper body, keep your shoulders relaxed but engaged, aligning them with your hips to ensure a straight, powerful throw. The power of a baseball throw does not solely come from the arm or shoulder; it’s a concerted effort of the entire body working in unity. Engaging your core throughout the throwing motion will significantly enhance your throw’s strength and accuracy. Remember, a well-executed throw always begins with a strong, balanced stance, setting the stage for maximizing power. Practice this positioning diligently, refining each element to harmonize your body mechanics, and witness a notable improvement in your throwing prowess.


